Kubernetes becomes easier when you first understand the problem it solves. The YAML files make more sense after that.
Imagine that you have one containerized application on one server. You can start it with Docker, point traffic at the server, and restart it when it fails. That is a perfectly reasonable beginning.
Then the application becomes important. You need several copies. You need updates without downtime, automatic recovery, and one stable address while containers come and go. You may also have background workers, scheduled tasks, and several environments. Starting one container is no longer the hard part. The hard part is keeping all of these containers working together across machines.
Kubernetes is the system that performs that coordination.
In this guide, you will:
- understand what Kubernetes solves and what it deliberately does not solve
- learn the control plane, node, Pod, Deployment, and Service mental models
- create a real Kubernetes cluster on your laptop with kind
- deploy a small web application from declarative YAML
- reach it through a stable Service
- watch Kubernetes replace a deleted Pod
- scale from two replicas to four
- perform a rolling image update and a rollback
- run a one-time Job and a scheduled CronJob
- inspect common failures using a repeatable debugging path
- remove the entire lab cleanly
The lab runs on macOS, Windows, or Linux. It requires no cloud account and does not push an image to a registry.
1. What problem does Kubernetes solve?
Containers package an application and its runtime dependencies. They make an application portable, but a container engine by itself does not answer the operational questions that appear when the application runs continuously:
- Which machine should run each container?
- What replaces a container after it crashes?
- How do clients find healthy copies when their IP addresses change?
- How do we add or remove replicas?
- How do we roll out a new version gradually?
- Where do configuration and credentials live?
- How do multiple services share a pool of machines safely?
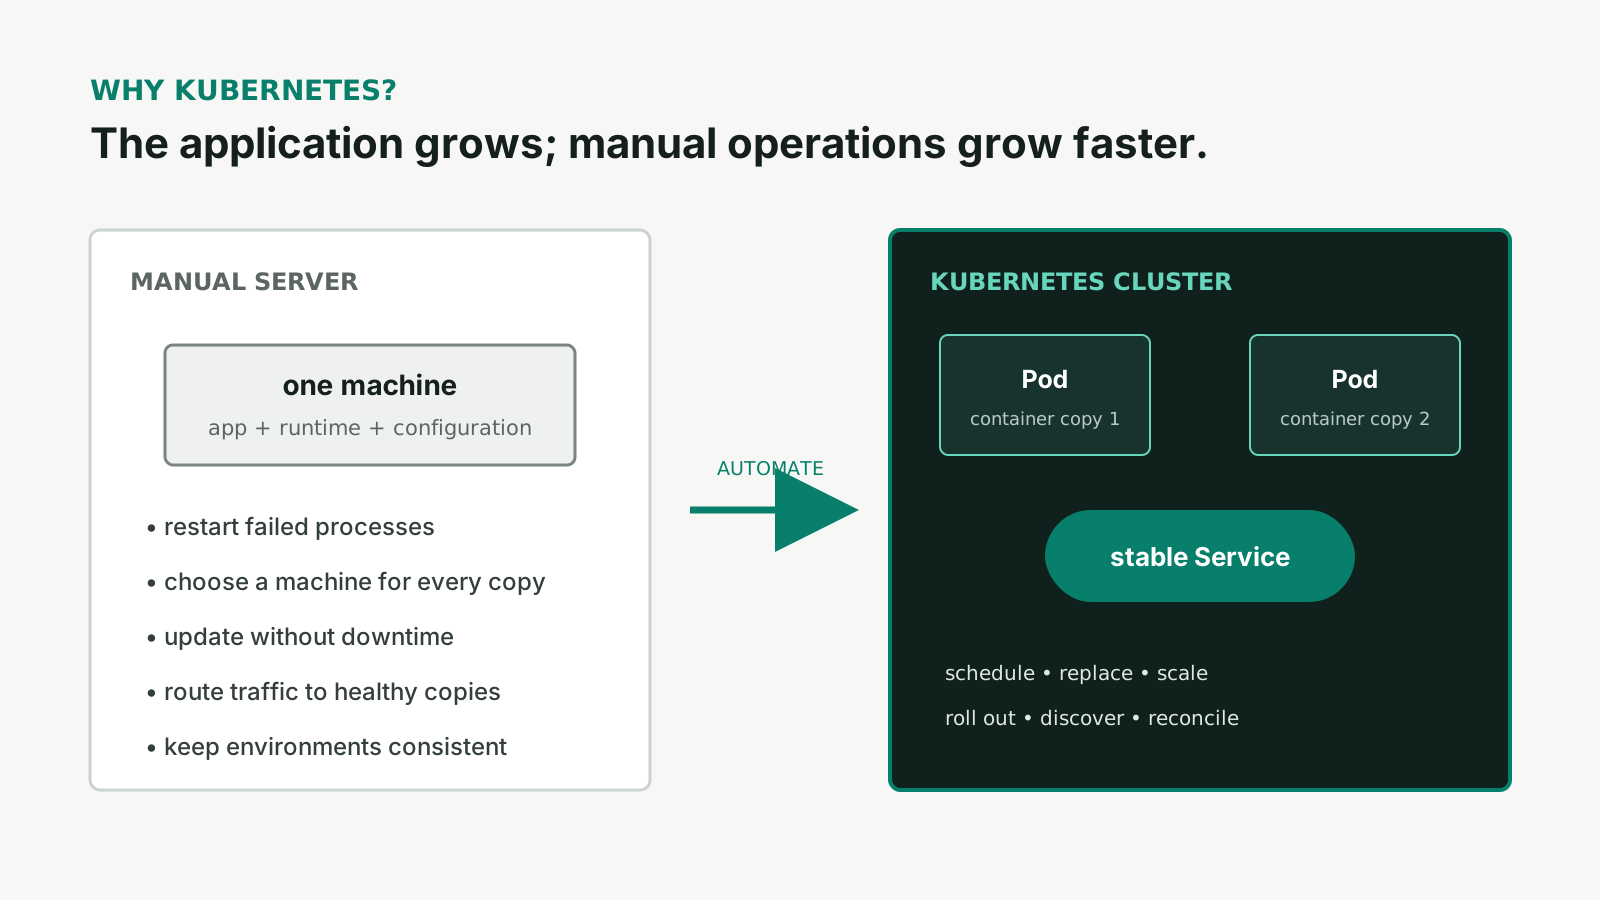
Kubernetes automates the coordination work that grows around containerized applications.
Kubernetes is an open-source container orchestration system. You describe the state you want, and a collection of control loops works to make the cluster match that description.
For example, you can declare:
replicas: 3
You are not writing a script that starts container one, then container two, then container three. You are declaring that three replicas should exist. If one disappears later, Kubernetes notices that the observed state has fallen below the desired state and creates a replacement.
This distinction—desired state rather than a sequence of commands—is the foundation of Kubernetes.
What Kubernetes gives you
Kubernetes provides building blocks for:
- scheduling containers onto a pool of machines
- maintaining a requested number of replicas
- restarting or replacing failed workloads
- stable service discovery and internal load balancing
- controlled application rollouts and rollbacks
- configuration and secret distribution
- batch and scheduled work
- resource requests, limits, and placement policy
- extension through custom APIs and controllers
The Kubernetes overview describes these capabilities as a portable, extensible platform for managing containerized workloads and services.
What Kubernetes does not give you automatically
Kubernetes does not make an application correct, observable, secure, or highly available merely because it runs in a cluster.
You still need to design:
- useful health checks
- data durability and backup
- application-level retries and idempotency
- metrics, logs, traces, and alerts
- network and identity policy
- safe resource limits
- multi-zone or multi-region topology when the availability target requires it
Kubernetes is an automation substrate. It continuously enforces the contracts you provide, including poorly designed contracts.
2. The mental model: an API plus control loops
Most Kubernetes interactions follow the same pattern:
- You submit a desired-state document to the Kubernetes API.
- The API validates and stores it.
- Controllers observe the stored desired state and the current world.
- Controllers create, update, or delete resources to reduce the difference.
- The loop repeats because the world can change at any time.
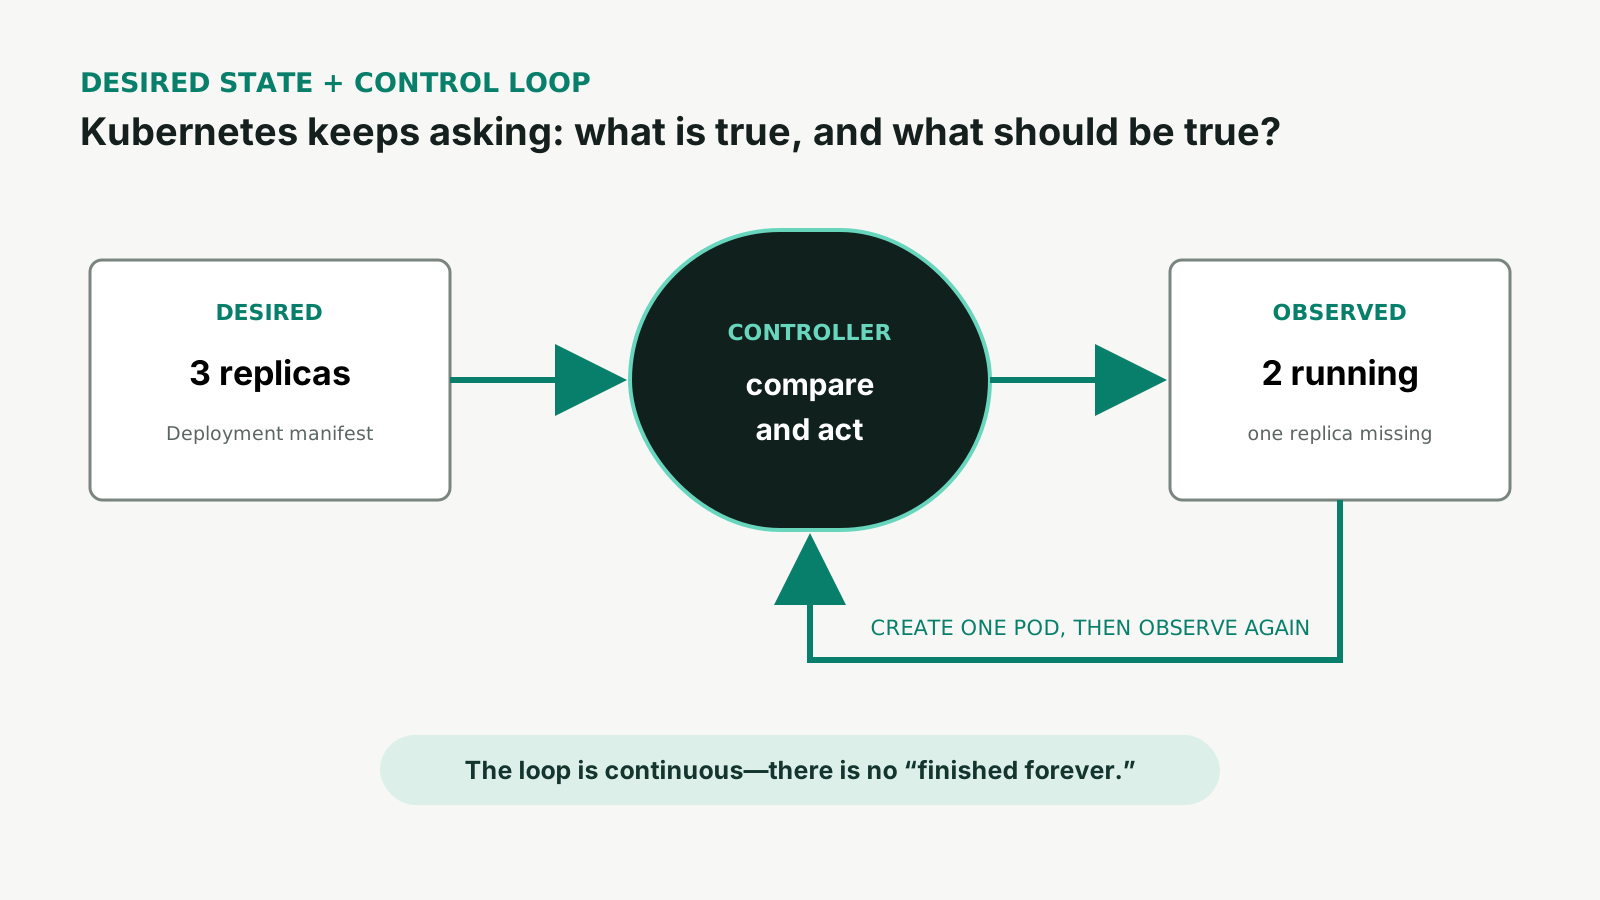
Reconciliation is continuous. A healthy cluster is not one that never changes; it is one that keeps converging after change.
This model explains several behaviors that otherwise feel surprising:
- Deleting a managed Pod does not reduce capacity permanently; its controller replaces it.
- Editing a live Pod is usually the wrong level of abstraction; its owning Deployment may overwrite or replace it.
- A command can succeed before the application is ready; the API accepted the desired state, but reconciliation is still happening.
- Events can be duplicated or missed by your terminal without breaking the control loop; current state remains authoritative.
3. Cluster anatomy
A Kubernetes cluster has a control plane and one or more worker nodes.
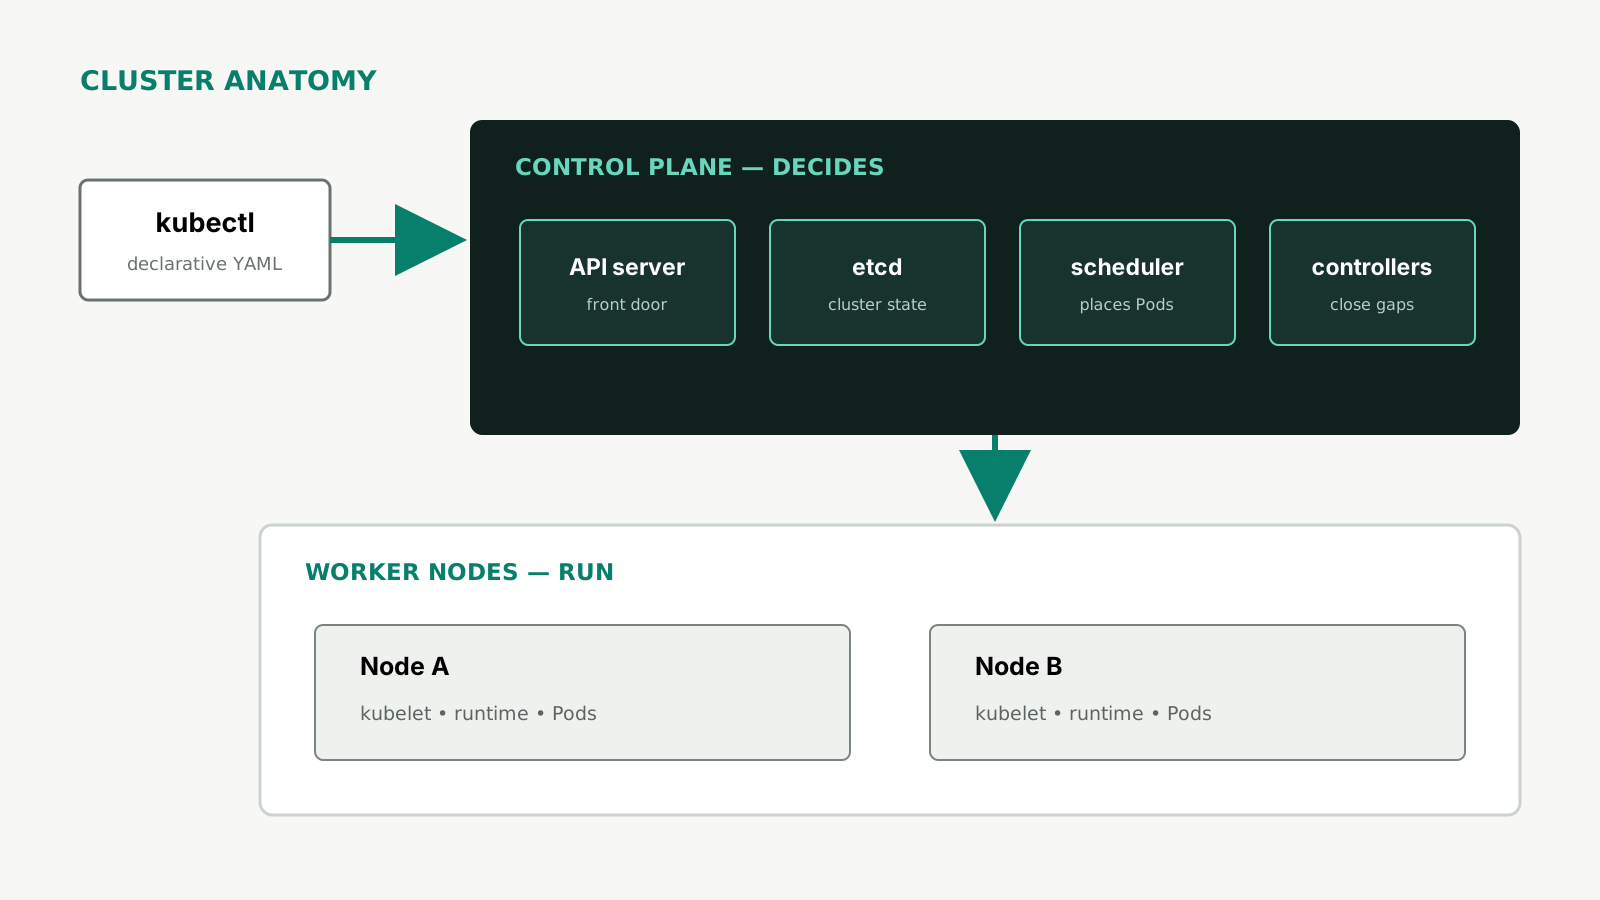
The control plane decides
The main control-plane components are:
- API server: the front door for reads and writes.
kubectl, controllers, and other clients communicate through it. - etcd: the consistent key-value store holding Kubernetes API state.
- scheduler: chooses a suitable node for each unscheduled Pod.
- controller manager: runs control loops that reconcile Deployments, ReplicaSets, Nodes, Jobs, and other resources.
The Kubernetes components reference explains the responsibility of each component in more detail.
Worker nodes run workloads
Each worker node normally includes:
- kubelet: ensures the Pod definitions assigned to the node are running
- container runtime: starts and stops containers
- networking components: implement Service routing and Pod connectivity
In a production cluster, nodes are usually virtual or physical machines. In this guide, kind runs each Kubernetes node as a Docker container. The Kubernetes behavior is real; only the underlying machines are local containers.
4. The five objects to learn first
Kubernetes exposes many API kinds. Begin with these five.
Pod: the smallest scheduled unit
A Pod contains one or more tightly coupled containers that share networking and selected storage. Most application Pods contain one main container, sometimes with sidecars or helper containers.
Pods are replaceable. Do not design around a particular Pod name or IP address surviving forever.
Deployment: a controller for stateless replicas
A Deployment describes an application template, replica count, and rollout strategy. It creates and manages ReplicaSets, which in turn maintain Pods.
Deployment
  └── ReplicaSet
        ├── Pod
        ├── Pod
        └── Pod
You normally update the Deployment, not its Pods directly.
Service: a stable network identity
A Service selects Pods by label and gives clients a stable virtual address. The selected Pods can be replaced without requiring clients to discover their new IP addresses.
ConfigMap and Secret: externalized configuration
A ConfigMap stores non-sensitive configuration. A Secret stores sensitive values in a Kubernetes object designed for controlled distribution. A Secret is not automatically encrypted merely because the object type is named Secret; production clusters need appropriate encryption-at-rest and access-control configuration.
Job and CronJob: finite work
A Job runs work to completion. A CronJob creates Jobs on a schedule. These are better fits than Deployments for migrations, reports, cleanup, and other finite tasks.
5. Prerequisites
You need a 64-bit macOS, Windows, or Linux laptop with:
- 8 GB of memory; 12 GB is more comfortable
- 8 GB of free disk space
- Docker
kubectl- kind
curlor a browser
The lab uses a single Kubernetes node to keep resource usage low.
Check what is already installed
Run:
docker version
kubectl version --client
kind version
curl --version
If a command prints a version, keep that installation and move on.
Install Docker
macOS: install Docker Desktop for Mac, open it, and wait for the engine to start.
Windows: install Docker Desktop for Windows and use the WSL 2 backend.
Linux: install Docker Engine for your distribution and start the Docker service.
Verify the running engine:
docker run --rm hello-world
Install kubectl
macOS with Homebrew:
brew install kubectl
Windows with WinGet:
winget install -e --id Kubernetes.kubectl
Linux: use the current binary instructions from the official kubectl installation guide.
Verify:
kubectl version --client
Install kind
macOS with Homebrew:
brew install kind
Windows with WinGet:
winget install Kubernetes.kind
Linux:
KIND_VERSION=v0.32.0
KIND_ARCH=amd64
[ "$(uname -m)" = "aarch64" ] && KIND_ARCH=arm64
curl -Lo kind "https://kind.sigs.k8s.io/dl/${KIND_VERSION}/kind-linux-${KIND_ARCH}"
chmod +x kind
sudo install -o root -g root -m 0755 kind /usr/local/bin/kind
The kind quick start lists current releases and alternative installation methods.
6. Create the local cluster
Create a directory for the lab:
mkdir kubernetes-intro
cd kubernetes-intro
Create kind-cluster.yaml:
kind: Cluster
apiVersion: kind.x-k8s.io/v1alpha4
nodes:
  - role: control-plane
    image: kindest/node:v1.35.0
    extraPortMappings:
      - containerPort: 30080
        hostPort: 8080
        protocol: TCP
Create the cluster:
kind create cluster \
  --name kubernetes-intro \
  --config kind-cluster.yaml \
  --wait 5m
On PowerShell, place the command on one line:
kind create cluster --name kubernetes-intro --config kind-cluster.yaml --wait 5m
kind creates a kubectl context named kind-kubernetes-intro. Verify it before applying anything:
kubectl config current-context
kubectl cluster-info --context kind-kubernetes-intro
kubectl get nodes -o wide
The node should reach Ready.
7. Deploy the first application
Create hello.yaml:
apiVersion: v1
kind: Namespace
metadata:
  name: intro
---
apiVersion: v1
kind: ConfigMap
metadata:
  name: hello-content
  namespace: intro
data:
  index.html: |
    <!doctype html>
    <html>
      <head><title>Kubernetes intro</title></head>
      <body>
        <h1>Hello from Kubernetes</h1>
        <p>A Service routed this request to a replaceable Pod.</p>
      </body>
    </html>
---
apiVersion: apps/v1
kind: Deployment
metadata:
  name: hello
  namespace: intro
spec:
  replicas: 2
  selector:
    matchLabels:
      app: hello
  strategy:
    type: RollingUpdate
    rollingUpdate:
      maxUnavailable: 0
      maxSurge: 1
  template:
    metadata:
      labels:
        app: hello
    spec:
      containers:
        - name: web
          image: nginx:1.27.5-alpine
          ports:
            - name: http
              containerPort: 80
          readinessProbe:
            httpGet:
              path: /
              port: http
            initialDelaySeconds: 2
            periodSeconds: 3
          livenessProbe:
            httpGet:
              path: /
              port: http
            initialDelaySeconds: 10
            periodSeconds: 10
          resources:
            requests:
              cpu: 20m
              memory: 24Mi
            limits:
              cpu: 200m
              memory: 96Mi
          volumeMounts:
            - name: content
              mountPath: /usr/share/nginx/html
      volumes:
        - name: content
          configMap:
            name: hello-content
---
apiVersion: v1
kind: Service
metadata:
  name: hello
  namespace: intro
spec:
  type: NodePort
  selector:
    app: hello
  ports:
    - name: http
      port: 80
      targetPort: http
      nodePort: 30080
Apply the desired state:
kubectl apply -f hello.yaml
kubectl rollout status deployment/hello -n intro --timeout=2m
Inspect what Kubernetes created:
kubectl get all -n intro
kubectl get deployment,replicaset,pods,service -n intro
The ownership chain should now be visible: the Deployment owns a ReplicaSet, and the ReplicaSet owns two Pods.
Read what each part of the manifest promises
The manifest says:
- keep two Pods whose template contains NGINX
- label each Pod
app: hello - consider a Pod ready only when an HTTP request to
/succeeds - restart the container when the liveness check repeatedly fails
- request a small amount of CPU and memory from the scheduler
- mount the HTML from a ConfigMap
- expose ready Pods with
app: hellothrough a Service - reserve NodePort
30080, which the kind configuration maps to laptop port8080
The values are intentionally small for a laptop. Production requests and limits should come from measurement, not from copying this example.
8. Follow a request through the cluster
Open http://localhost:8080 or run:
curl http://localhost:8080
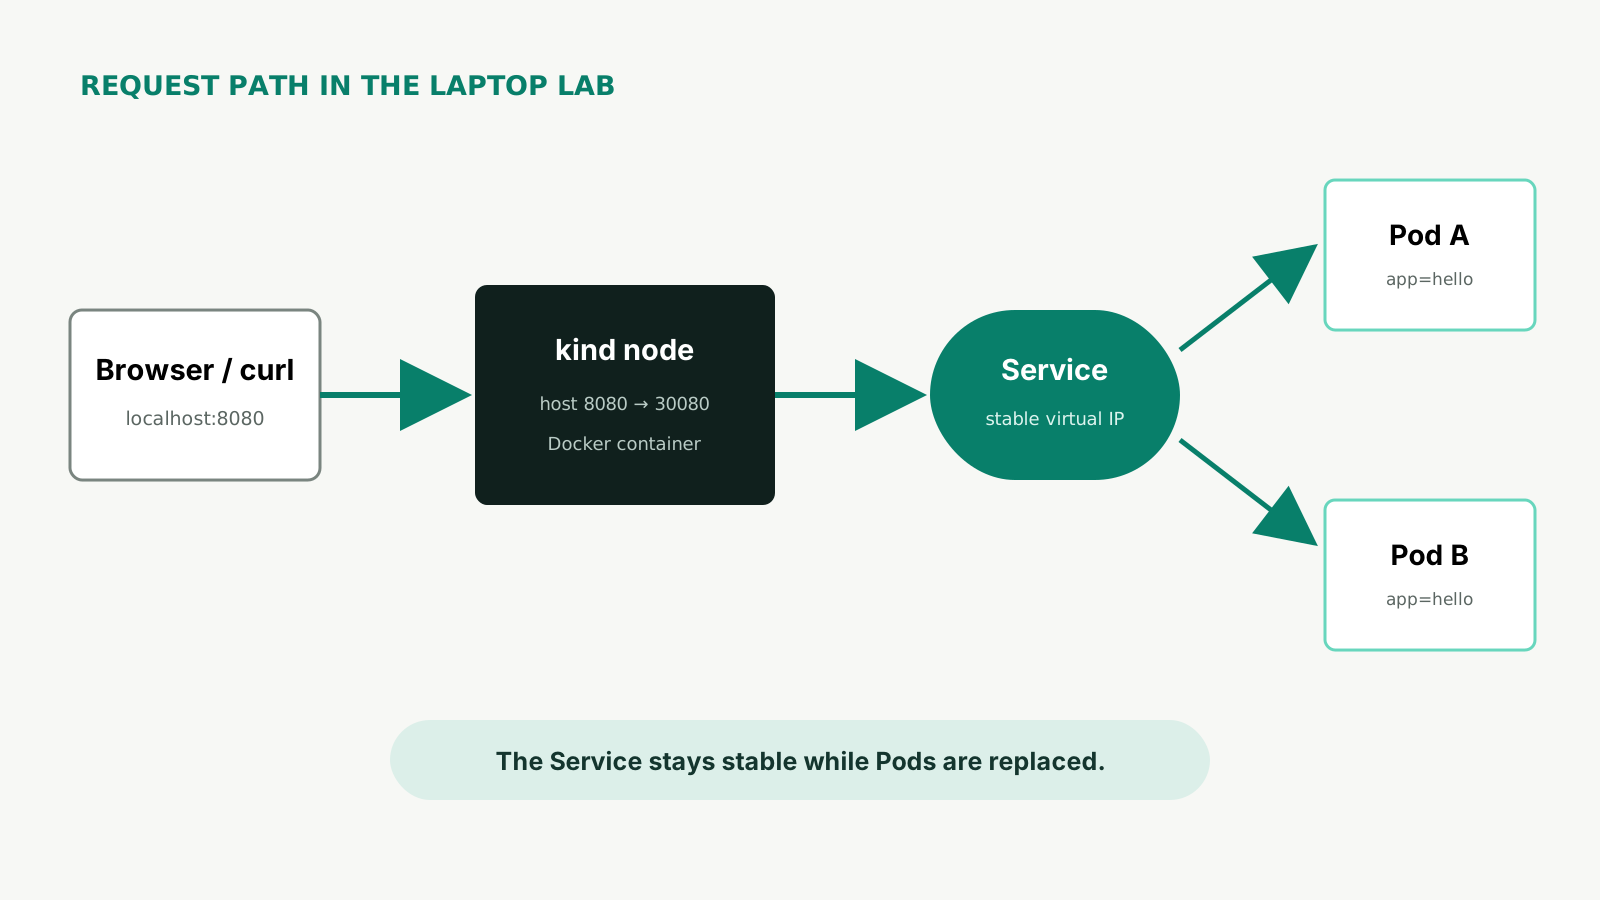
The Service is stable even though its backing Pods are replaceable.
Inspect the Service and its current endpoints:
kubectl describe service hello -n intro
kubectl get endpointslices -n intro -l kubernetes.io/service-name=hello
The selector app: hello connects the Service to the Pods. If the labels do not match, the Service exists but has no endpoints—a common source of “the Pod is running, but the application is unreachable.”
9. Practice self-healing
List the Pods and keep the command running:
kubectl get pods -n intro --watch
In a second terminal, select one Pod and delete it:
POD_NAME=$(kubectl get pods -n intro -l app=hello \
  -o jsonpath='{.items[0].metadata.name}')
kubectl delete pod -n intro "$POD_NAME"
On PowerShell, copy one Pod name from kubectl get pods -n intro and run:
kubectl delete pod -n intro POD_NAME
Watch what happens:
- The old Pod enters termination.
- The ReplicaSet observes fewer than two replicas.
- It creates a new Pod.
- The scheduler assigns the new Pod to the node.
- The readiness probe succeeds.
- The Service includes the new endpoint.
The replacement Pod has a different name and IP. The Deployment and Service remain stable.
Stop the watch with Ctrl+C, then confirm:
kubectl get pods -n intro -o wide
curl http://localhost:8080
10. Practice scaling
Scale the Deployment from two replicas to four:
kubectl scale deployment hello -n intro --replicas=4
kubectl rollout status deployment/hello -n intro --timeout=2m
kubectl get pods -n intro
The imperative command changes the Deployment's desired replica count in the API. For durable configuration, make the same change in hello.yaml:
spec:
  replicas: 4
Then reapply it:
kubectl apply -f hello.yaml
This prevents a future apply from silently returning the count to two.
Scale back down for the rest of the lab:
kubectl scale deployment hello -n intro --replicas=2
Kubernetes also supports automatic scaling, but an autoscaler needs metrics and a scaling policy. The important first lesson is that scaling changes desired state; controllers perform the actual creation and removal.
11. Practice a rolling update and rollback
Display the current image:
kubectl get deployment hello -n intro \
  -o jsonpath='{.spec.template.spec.containers[0].image}{"\n"}'
On PowerShell, this simpler form avoids shell quoting differences:
kubectl get deployment hello -n intro -o wide
Update NGINX:
kubectl set image deployment/hello -n intro web=nginx:1.28.0-alpine
kubectl rollout status deployment/hello -n intro --timeout=2m
kubectl rollout history deployment/hello -n intro
The Deployment creates a new ReplicaSet. Because maxUnavailable is zero and maxSurge is one, it can create one extra Pod before removing an old one. Readiness gates traffic: a new Pod does not become a Service endpoint until its probe succeeds.
Inspect the result:
kubectl get replicasets,pods -n intro
kubectl get deployment hello -n intro \
  -o jsonpath='{.spec.template.spec.containers[0].image}{"\n"}'
curl http://localhost:8080
Now roll back:
kubectl rollout undo deployment/hello -n intro
kubectl rollout status deployment/hello -n intro --timeout=2m
kubectl get deployment hello -n intro \
  -o jsonpath='{.spec.template.spec.containers[0].image}{"\n"}'
Update hello.yaml back to the image you intend to keep. The file should remain the source of truth rather than becoming an outdated snapshot of the cluster.
12. Run finite and scheduled work
A Deployment is for a continuously running service. Use a Job when the work should finish.
Create jobs.yaml:
apiVersion: batch/v1
kind: Job
metadata:
  name: hello-once
  namespace: intro
spec:
  template:
    spec:
      restartPolicy: Never
      containers:
        - name: task
          image: busybox:1.37
          command: ["sh", "-c", "echo one-time task completed; date"]
  backoffLimit: 2
---
apiVersion: batch/v1
kind: CronJob
metadata:
  name: hello-schedule
  namespace: intro
spec:
  schedule: "*/5 * * * *"
  concurrencyPolicy: Forbid
  successfulJobsHistoryLimit: 1
  failedJobsHistoryLimit: 1
  jobTemplate:
    spec:
      template:
        spec:
          restartPolicy: Never
          containers:
            - name: task
              image: busybox:1.37
              command: ["sh", "-c", "echo scheduled task ran; date"]
Apply and inspect the one-time Job:
kubectl apply -f jobs.yaml
kubectl wait -n intro --for=condition=complete job/hello-once --timeout=2m
kubectl logs -n intro job/hello-once
kubectl get jobs,cronjobs -n intro
You do not need to wait five minutes to test the CronJob template. Create an immediate Job from it:
kubectl create job -n intro \
  --from=cronjob/hello-schedule \
  hello-schedule-manual
kubectl wait -n intro \
  --for=condition=complete \
  job/hello-schedule-manual \
  --timeout=2m
kubectl logs -n intro job/hello-schedule-manual
This object choice communicates intent: continuously running service, finite task, or scheduled task.
13. Common Kubernetes use cases
The APIs you just used combine into several common patterns.
Stateless web API
Use a Deployment for interchangeable API replicas, a Service for stable discovery, ConfigMaps and Secrets for configuration, readiness probes for traffic admission, and an autoscaler when load varies.
Background worker
Use a Deployment for workers that continuously consume a queue. Scale replicas based on queue depth or processing latency. Make message handling idempotent because a worker can fail after performing work but before acknowledging a message.
Database migration or report
Use a Job for finite work. Set a bounded retry policy and make the operation safe to repeat. Do not hide migrations inside every application Pod startup; concurrent replicas can race.
Scheduled cleanup or backup trigger
Use a CronJob. Choose a concurrency policy deliberately and monitor missed or failed runs. A schedule expresses when Kubernetes should create a Job, not whether the business operation succeeded.
Stateful system
Kubernetes can run databases and other stateful systems using StatefulSets, persistent volumes, topology rules, and operators. The operational burden does not disappear. Backups, restores, replication semantics, and storage failure modes remain application-specific.
Platform for many teams
Namespaces, quotas, policy, workload identity, standard controllers, and reusable deployment templates can give teams a consistent application platform. This is where Kubernetes often provides more value than any single feature: it creates one extensible operating contract across workloads.
14. A debugging path that scales
When something fails, avoid random commands. Move from desired state to observed state and then to evidence.
1. Confirm context and namespace
kubectl config current-context
kubectl get namespace intro
2. Get a compact workload view
kubectl get deployment,replicaset,pods,service,endpointslices -n intro
3. Describe the failing object
kubectl describe deployment hello -n intro
kubectl describe pod POD_NAME -n intro
The Events section often reveals scheduling failures, image-pull errors, and failed probes.
4. Read bounded logs
kubectl logs -n intro POD_NAME --tail=100
kubectl logs -n intro POD_NAME --previous --tail=100
--previous is useful after a container restarts.
5. Verify selectors and endpoints
kubectl get pods -n intro --show-labels
kubectl get service hello -n intro -o yaml
kubectl get endpointslices -n intro -l kubernetes.io/service-name=hello
6. Check rollout state
kubectl rollout status deployment/hello -n intro
kubectl rollout history deployment/hello -n intro
This sequence works because it follows the system: API selection, controller state, Pod state, container evidence, and network selection.
15. Useful kubectl habits
These commands are worth learning early:
# Discover API resources
kubectl api-resources

# Explain a field from the server's API schema
kubectl explain deployment.spec.strategy

# Preview the server-side result without persisting it
kubectl apply --server-side --dry-run=server -f hello.yaml

# Show differences before an apply
kubectl diff -f hello.yaml

# Watch a resource change
kubectl get pods -n intro --watch

# Select objects by label
kubectl get pods -n intro -l app=hello

# Render structured output for scripts
kubectl get deployment hello -n intro -o json
Prefer declarative files in version control for lasting changes. Imperative commands are useful for learning, inspection, and incident response, but a cluster changed only from a terminal is hard to reproduce or review.
16. What this laptop lab teaches about production
The local cluster is small, but its principles transfer.
A Pod is replaceable
Store durable data outside a stateless Pod. Make shutdown graceful and startup repeatable.
Readiness controls traffic
A process can be running before it is ready. Readiness should reflect whether the instance can serve useful requests now.
Liveness is a restart policy
A bad liveness probe can create an outage by repeatedly killing slow but recoverable instances. Use it only for conditions a restart can fix.
Resource requests affect placement
The scheduler uses requests when choosing a node. Limits constrain runtime usage. Missing or unrealistic values make capacity planning and noisy-neighbor control harder.
Labels are part of the API design
Services, policies, dashboards, and automation select workloads through labels. Treat label names and values as stable contracts.
Rollback is not data rollback
kubectl rollout undo restores a previous Pod template. It does not reverse a database migration or an external side effect. Application releases need compatible data and rollback plans.
One local node is not high availability
This lab demonstrates Kubernetes behavior, not infrastructure resilience. Production availability requires multiple failure domains, redundant control-plane components, durable storage, load balancing, backups, and tested recovery.
17. Clean up
Delete the cluster:
kind delete cluster --name kubernetes-intro
Confirm that the context is gone:
kind get clusters
kubectl config get-contexts
The Docker containers, Pods, Services, Jobs, and namespace inside the cluster are removed. Your kind-cluster.yaml, hello.yaml, and jobs.yaml files remain as a reproducible lab.
18. What to learn next
You now have the vocabulary and operational model needed for deeper Kubernetes topics.
A useful sequence is:
- ConfigMaps, Secrets, and environment-specific configuration
- requests, limits, probes, and graceful shutdown
- Ingress or Gateway API for HTTP entry points
- persistent volumes and StatefulSets
- RBAC, service accounts, and workload identity
- network policies
- metrics, logs, tracing, and autoscaling
- controllers, operators, and custom resources
The key mental model should remain stable through all of them:
declare desired state
        ↓
observe current state
        ↓
reconcile the difference
        ↓
repeat forever
Sources and further reading
- Kubernetes overview — what Kubernetes is and the platform capabilities it provides
- Kubernetes components — control-plane and node responsibilities
- Pods — the smallest deployable unit
- Deployments — replicas, rolling updates, and rollback
- Services — stable networking for replaceable Pods
- Jobs and CronJobs — finite and scheduled workloads
- Configure probes — readiness, liveness, and startup behavior
- kind quick start — local cluster installation and operation
- Learn Kubernetes Basics — the official interactive tutorial sequence