A blue-green deployment keeps two complete application versions available at the same time:
- Blue is the stable version receiving production traffic.
- Green is the candidate version you deploy and validate before the switch.
Kubernetes keeps both versions running. Istio decides which one receives each request. You can move traffic in small steps and roll back without rebuilding an image or waiting for the old version to start.
Let’s build the complete flow on your laptop. You will:
- create a local Kubernetes cluster with kind
- install Istio and automatic sidecar injection
- deploy independent Blue and Green workloads
- route ordinary traffic to Blue
- reach Green privately with a preview header
- shift traffic from 100/0 to 90/10, 50/50, and 0/100
- simulate a Green failure that Kubernetes readiness does not detect
- roll traffic back to Blue immediately
No cloud account, organization, or container registry login is required. The lab pulls two public multi-architecture images directly from Docker Hub:
- Blue:
nginx:1.27.5-alpine - Green:
nginx:1.28.0-alpine
How the deployment works
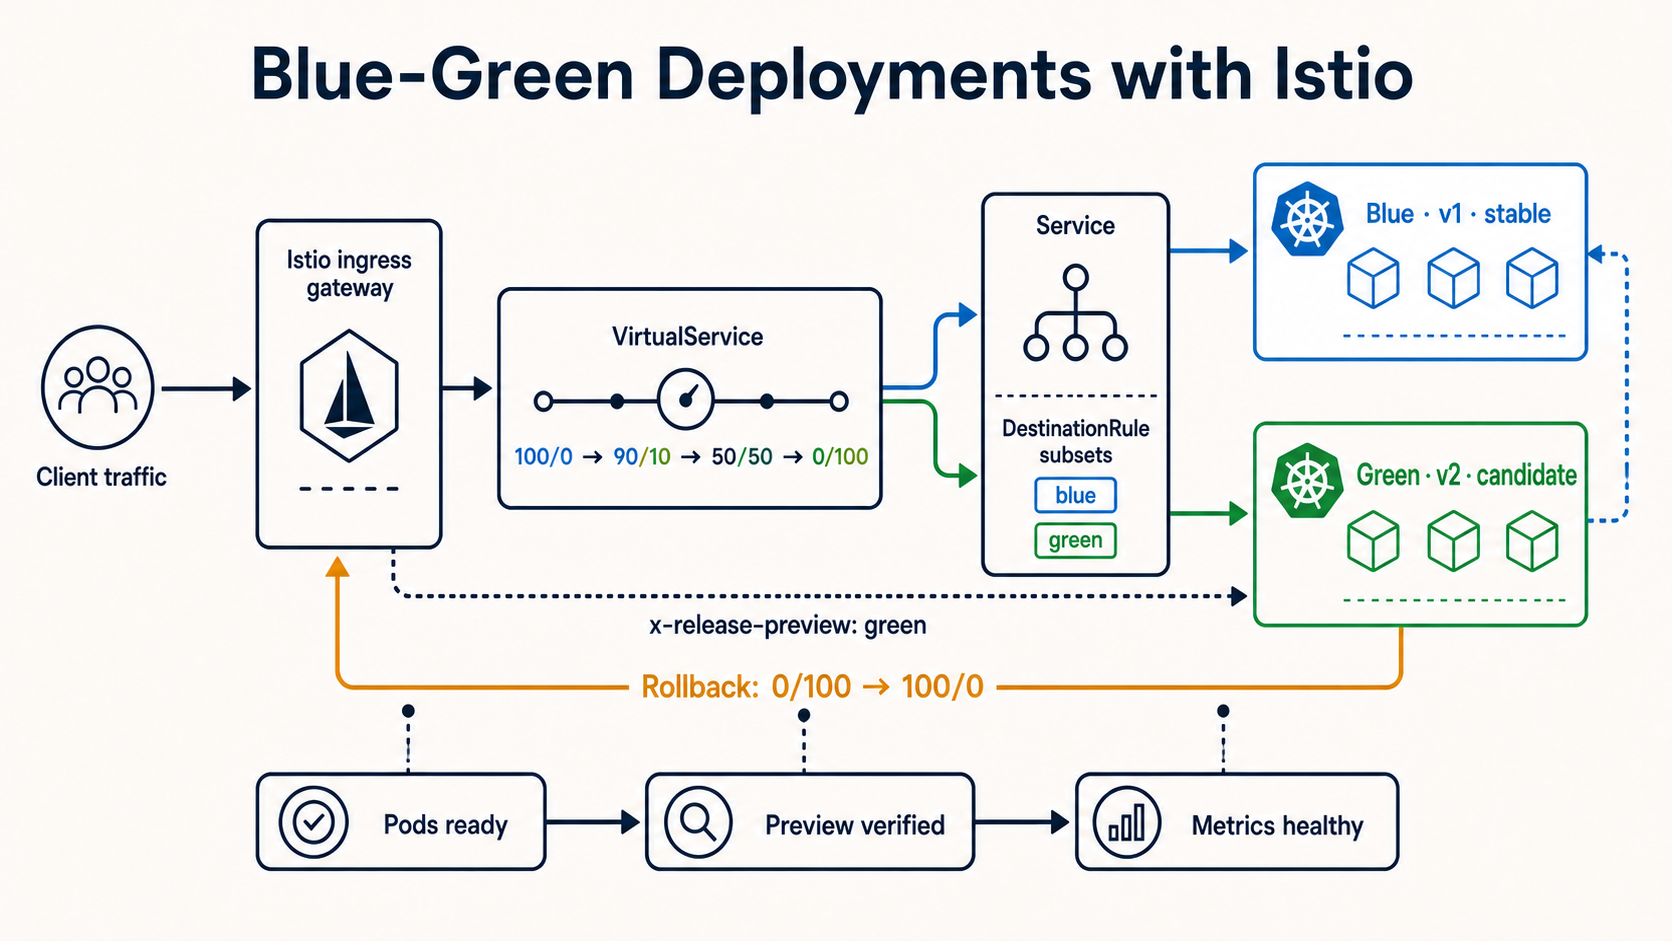
One Kubernetes Service selects both Deployments. An Istio DestinationRule divides those pods into blue and green subsets using their version labels. A VirtualService then assigns traffic weights to the subsets.
The preview route is evaluated first. Requests with x-release-preview: green go only to Green, while ordinary traffic follows the current production weights.
Prerequisites
You need a 64-bit macOS, Windows, or Linux computer with:
- 8 GB of system memory; 12 GB is more comfortable
- 10 GB of free disk space
- Docker
kubectl- kind
istioctl1.30.xcurlorcurl.exe
This lab uses Kubernetes 1.35 because Istio 1.30 is tested with Kubernetes 1.32 through 1.36.
Check what is already installed
Run these commands first:
docker version
kubectl version --client
kind version
istioctl version --remote=false
curl --version
If a command prints a version, keep it and move to the next prerequisite. Install only what is missing.
1. Install Docker
kind runs each Kubernetes node as a Docker container.
macOS: install Docker Desktop for Mac, start it, and wait for the engine to report that it is running.
Windows: install Docker Desktop for Windows. Enable the WSL 2 backend when prompted, then start Docker Desktop.
Linux: follow the Docker Engine instructions for your distribution, start the Docker service, and configure non-root access if desired.
Verify the running engine—not only the client:
docker run --rm hello-world
2. Install kubectl
macOS with Homebrew:
brew install kubectl
Without Homebrew, use the official macOS binary instructions.
Windows with WinGet:
winget install -e --id Kubernetes.kubectl
Open a new PowerShell window afterward. The official Windows guide lists alternative installers.
Linux:
KUBECTL_ARCH=amd64
[ "$(uname -m)" = "aarch64" ] && KUBECTL_ARCH=arm64
curl -LO "https://dl.k8s.io/release/$(curl -L -s https://dl.k8s.io/release/stable.txt)/bin/linux/${KUBECTL_ARCH}/kubectl"
chmod +x kubectl
sudo install -o root -g root -m 0755 kubectl /usr/local/bin/kubectl
The official Linux guide also includes package-manager and checksum-verification options.
Verify:
kubectl version --client
3. Install kind
macOS with Homebrew:
brew install kind
Windows with WinGet:
winget install Kubernetes.kind
Linux:
KIND_VERSION=v0.32.0
KIND_ARCH=amd64
[ "$(uname -m)" = "aarch64" ] && KIND_ARCH=arm64
curl -Lo kind "https://kind.sigs.k8s.io/dl/${KIND_VERSION}/kind-linux-${KIND_ARCH}"
chmod +x kind
sudo mv kind /usr/local/bin/kind
Confirm the current stable release in the kind quick start, then verify:
kind version
4. Install Istio and istioctl
The lab uses Istio 1.30.3.
macOS or Linux:
curl -L https://istio.io/downloadIstio | ISTIO_VERSION=1.30.3 sh -
cd istio-1.30.3
export PATH="$PWD/bin:$PATH"
That PATH change applies to the current terminal. To keep it permanently, add the export to your shell profile with the absolute path to the extracted directory.
Windows: download the Istio 1.30.3 archive for Windows from the official release page, extract it, and add its bin directory to your user Path. Then open a new PowerShell window.
Verify:
istioctl version --remote=false
5. Prepare a shell and curl
The file and loop examples use Bash. macOS and Linux already provide a suitable shell. On Windows, run the lab in WSL or Git Bash. PowerShell alternatives are included for the traffic tests.
Most systems include curl. On Windows, use curl.exe so PowerShell does not substitute a different command.
1. Create a compatible Kubernetes cluster
Create a single-node Kubernetes 1.35 cluster:
kind create cluster \
  --name blue-green-lab \
  --image kindest/node:v1.35.0 \
  --wait 5m
Confirm that kubectl points to the new context:
kubectl config current-context
kubectl get nodes
The context should be kind-blue-green-lab, and the node should become Ready.
If another context is shown, select the lab explicitly before continuing:
kubectl config use-context kind-blue-green-lab
2. Install Istio
For this local lab, install Istio's default profile and enable access logs:
istioctl install -y \
  --set profile=default \
  --set meshConfig.accessLogFile=/dev/stdout
Wait for the control plane and ingress gateway:
kubectl rollout status deployment/istiod -n istio-system --timeout=3m
kubectl rollout status deployment/istio-ingressgateway -n istio-system --timeout=3m
istioctl verify-install
The default profile is a sensible evaluation baseline. For production, keep a reviewed IstioOperator or Helm values file in source control instead of relying on command-line flags.
3. Create the namespace and application files
Create the project directories:
mkdir blue-green-istio
cd blue-green-istio
mkdir app routes
Create app/namespace.yaml. The label enables automatic Envoy sidecar injection for new pods:
apiVersion: v1
kind: Namespace
metadata:
  name: blue-green
  labels:
    istio-injection: enabled
Create app/blue-nginx.conf:
server {
  listen 8080;

  location = /healthz {
    access_log off;
    return 200 "healthy\n";
  }

  location / {
    add_header X-Release blue always;
    default_type text/plain;
    return 200 "BLUE v1 — stable\n";
  }
}
Create app/green-nginx.conf:
server {
  listen 8080;

  location = /healthz {
    access_log off;
    return 200 "healthy\n";
  }

  location / {
    add_header X-Release green always;
    default_type text/plain;
    return 200 "GREEN v2 — candidate\n";
  }
}
Create the namespace and ConfigMaps from those files:
kubectl apply -f app/namespace.yaml

kubectl -n blue-green create configmap blue-nginx \
  --from-file=default.conf=app/blue-nginx.conf

kubectl -n blue-green create configmap green-nginx \
  --from-file=default.conf=app/green-nginx.conf
The namespace layout is intentionally small and explicit:
| Resource | Scope or namespace |
|---|---|
| kind cluster | Your laptop, in Docker |
| Istio control plane and ingress gateway | istio-system |
| Blue and Green Deployments, Service, and ConfigMaps | blue-green |
| Gateway, DestinationRule, and VirtualService | blue-green |
Every namespaced manifest below declares namespace: blue-green. The only cross-namespace command is the local port-forward to Istio's ingress Service in istio-system.
4. Deploy Blue and Green
Create app/workloads.yaml:
apiVersion: apps/v1
kind: Deployment
metadata:
  name: web-blue
  namespace: blue-green
spec:
  replicas: 2
  selector:
    matchLabels:
      app: web
      version: blue
  template:
    metadata:
      labels:
        app: web
        version: blue
    spec:
      containers:
        - name: nginx
          image: nginx:1.27.5-alpine
          imagePullPolicy: IfNotPresent
          ports:
            - containerPort: 8080
          readinessProbe:
            httpGet:
              path: /healthz
              port: 8080
            initialDelaySeconds: 2
            periodSeconds: 3
          resources:
            requests:
              cpu: 25m
              memory: 32Mi
            limits:
              memory: 64Mi
          volumeMounts:
            - name: config
              mountPath: /etc/nginx/conf.d/default.conf
              subPath: default.conf
      volumes:
        - name: config
          configMap:
            name: blue-nginx
---
apiVersion: apps/v1
kind: Deployment
metadata:
  name: web-green
  namespace: blue-green
spec:
  replicas: 2
  selector:
    matchLabels:
      app: web
      version: green
  template:
    metadata:
      labels:
        app: web
        version: green
    spec:
      containers:
        - name: nginx
          image: nginx:1.28.0-alpine
          imagePullPolicy: IfNotPresent
          ports:
            - containerPort: 8080
          readinessProbe:
            httpGet:
              path: /healthz
              port: 8080
            initialDelaySeconds: 2
            periodSeconds: 3
          resources:
            requests:
              cpu: 25m
              memory: 32Mi
            limits:
              memory: 64Mi
          volumeMounts:
            - name: config
              mountPath: /etc/nginx/conf.d/default.conf
              subPath: default.conf
      volumes:
        - name: config
          configMap:
            name: green-nginx
---
apiVersion: v1
kind: Service
metadata:
  name: web
  namespace: blue-green
spec:
  selector:
    app: web
  ports:
    - name: http
      port: 80
      targetPort: 8080
Apply the workloads and wait for both versions:
kubectl apply -f app/workloads.yaml
kubectl rollout status deployment/web-blue -n blue-green --timeout=3m
kubectl rollout status deployment/web-green -n blue-green --timeout=3m
kubectl get pods -n blue-green --show-labels
Each pod should show 2/2 containers: Nginx plus the injected Envoy proxy.
5. Define the Istio traffic boundary
Create routes/mesh.yaml:
apiVersion: networking.istio.io/v1
kind: Gateway
metadata:
  name: web
  namespace: blue-green
spec:
  selector:
    istio: ingressgateway
  servers:
    - port:
        number: 80
        name: http
        protocol: HTTP
      hosts:
        - bluegreen.local
---
apiVersion: networking.istio.io/v1
kind: DestinationRule
metadata:
  name: web
  namespace: blue-green
spec:
  host: web.blue-green.svc.cluster.local
  subsets:
    - name: blue
      labels:
        version: blue
    - name: green
      labels:
        version: green
Create routes/virtual-service.yaml:
apiVersion: networking.istio.io/v1
kind: VirtualService
metadata:
  name: web
  namespace: blue-green
spec:
  hosts:
    - bluegreen.local
  gateways:
    # namespace/name keeps the reference unambiguous.
    - blue-green/web
  http:
    # Private validation path. Keep this rule before the default route.
    - name: green-preview
      match:
        - headers:
            x-release-preview:
              exact: green
      route:
        - destination:
            host: web.blue-green.svc.cluster.local
            subset: green
          weight: 100
    # Ordinary production traffic starts entirely on Blue.
    - name: production
      route:
        - destination:
            host: web.blue-green.svc.cluster.local
            subset: blue
          weight: 100
        - destination:
            host: web.blue-green.svc.cluster.local
            subset: green
          weight: 0
Apply and validate the routing configuration:
kubectl apply -f routes/mesh.yaml
kubectl apply -f routes/virtual-service.yaml
istioctl analyze -n blue-green
Do not continue if istioctl analyze reports an error.
6. Open the ingress gateway locally
In a dedicated terminal, forward local port 8080 to Istio's ingress gateway:
kubectl port-forward \
  -n istio-system \
  service/istio-ingressgateway \
  8080:80
Leave that process running. Use a second terminal in the project directory for the remaining commands.
The Host header must match the Gateway and VirtualService host:
curl -i -H 'Host: bluegreen.local' http://localhost:8080/
The response should be 200, include X-Release: blue, and contain BLUE v1 — stable.
PowerShell:
curl.exe -i -H "Host: bluegreen.local" http://localhost:8080/
7. Validate Green without production traffic
Send the private preview header:
curl -i \
  -H 'Host: bluegreen.local' \
  -H 'x-release-preview: green' \
  http://localhost:8080/
You should receive X-Release: green and GREEN v2 — candidate. Without the preview header, repeat requests still go only to Blue.
Validate more than the homepage before shifting traffic. A real release gate should cover:
- readiness and startup status
- critical API operations
- database compatibility
- authentication and authorization
- telemetry, dashboards, and alerts
- dependencies and timeout behavior
8. Shift 10% of production traffic to Green
The preview rule is http[0]; the production rule is http[1]. Patch only the two production weights:
kubectl patch virtualservice web -n blue-green --type=json -p='[
  {"op":"replace","path":"/spec/http/1/route/0/weight","value":90},
  {"op":"replace","path":"/spec/http/1/route/1/weight","value":10}
]'
Confirm the active configuration:
kubectl get virtualservice web -n blue-green -o yaml
Send 50 requests and summarize the responses:
for i in $(seq 1 50); do
  curl -s -H 'Host: bluegreen.local' http://localhost:8080/
done | sort | uniq -c
PowerShell:
1..50 | ForEach-Object {
  curl.exe -s -H "Host: bluegreen.local" http://localhost:8080/
} | Group-Object
The small sample will not produce exactly 45 Blue and 5 Green responses every time. Istio's weights describe probability across traffic, not a fixed request counter.
Hold at 90/10 while you inspect error rate, latency, saturation, and business-level checks. Traffic should advance only when the observation window passes.
9. Advance to 50/50, then 100% Green
Move to an even split:
kubectl patch virtualservice web -n blue-green --type=json -p='[
  {"op":"replace","path":"/spec/http/1/route/0/weight","value":50},
  {"op":"replace","path":"/spec/http/1/route/1/weight","value":50}
]'
Repeat the traffic test and observation window. If Green remains healthy, complete the switch:
kubectl patch virtualservice web -n blue-green --type=json -p='[
  {"op":"replace","path":"/spec/http/1/route/0/weight","value":0},
  {"op":"replace","path":"/spec/http/1/route/1/weight","value":100}
]'
Verify several ordinary requests:
for i in $(seq 1 10); do
  curl -s -H 'Host: bluegreen.local' http://localhost:8080/
done
Every new request should reach Green. Keep Blue running during the rollback window; scaling it to zero would turn a routing rollback into a capacity-recovery exercise.
10. Simulate a failure readiness does not catch
Create app/green-broken.conf:
server {
  listen 8080;

  location = /healthz {
    access_log off;
    return 200 "healthy\n";
  }

  location / {
    add_header X-Release green always;
    default_type text/plain;
    return 500 "GREEN v2 — checkout dependency failed\n";
  }
}
Update the Green ConfigMap and restart only the Green Deployment:
kubectl -n blue-green create configmap green-nginx \
  --from-file=default.conf=app/green-broken.conf \
  --dry-run=client -o yaml | kubectl apply -f -

kubectl rollout restart deployment/web-green -n blue-green
kubectl rollout status deployment/web-green -n blue-green --timeout=3m
Kubernetes reports the pods as Ready because /healthz still returns 200. The user path fails:
curl -i -H 'Host: bluegreen.local' http://localhost:8080/
This is a realistic release failure: infrastructure health is green, but application behavior is not. Synthetic transactions and request metrics must participate in the release decision.
11. Roll back traffic to Blue
Restore Blue's production weight immediately:
kubectl patch virtualservice web -n blue-green --type=json -p='[
  {"op":"replace","path":"/spec/http/1/route/0/weight","value":100},
  {"op":"replace","path":"/spec/http/1/route/1/weight","value":0}
]'
Verify recovery:
for i in $(seq 1 10); do
  curl -s -o /dev/null -w '%{http_code}\n' \
    -H 'Host: bluegreen.local' http://localhost:8080/
done
Then inspect one complete response:
curl -i -H 'Host: bluegreen.local' http://localhost:8080/
You should receive 200, X-Release: blue, and the Blue response. The rollback did not recreate Blue or mutate either Deployment; it changed only Istio's routing state.
12. Fix Green and choose the next step
Restore the good Green configuration:
kubectl -n blue-green create configmap green-nginx \
  --from-file=default.conf=app/green-nginx.conf \
  --dry-run=client -o yaml | kubectl apply -f -

kubectl rollout restart deployment/web-green -n blue-green
kubectl rollout status deployment/web-green -n blue-green --timeout=3m
Validate Green again through the preview header. After the incident is understood, either repeat the staged promotion or leave traffic on Blue and remove the rejected Green release.
In production, do not automatically retry a failed promotion without recording the release version, failure evidence, rollback time, and approval for another attempt.
Rollback runbook
Use this short sequence during a real incident:
- Confirm the regression is correlated with Green.
- Set Blue to 100 and Green to 0 in the production VirtualService route.
- Verify the routing configuration was accepted with
istioctl analyze. - Confirm user-facing status, latency, and error metrics recover.
- Keep Green isolated for investigation; do not destroy evidence immediately.
- Record the timeline, release identity, traffic weights, and operator.
- Revert or repair Green only after production is stable.
The routing rollback is safe only if Blue is still compatible with current data and dependencies. Database migrations must be backward compatible for at least the rollback window.
Production checklist
- Blue and Green use immutable, traceable image digests.
- Both versions have enough capacity for their assigned traffic.
- Blue retains enough capacity for an immediate 100% rollback.
- Readiness probes test dependencies required to serve traffic.
- Synthetic transactions cover business-critical behavior.
- The preview path is authenticated or inaccessible publicly.
- VirtualService changes are reviewed and stored in source control.
- Traffic steps have explicit success metrics and observation windows.
- Alerts distinguish Blue from Green by workload and version labels.
- Schema changes remain backward compatible through the rollback window.
- Session state is externalized or compatible across both versions.
- Rollback authority, audit logging, and incident ownership are defined.
- Old Blue is removed only after the rollback window closes.
Clean up the lab
Stop the port-forward with Ctrl+C, then remove the cluster:
kind delete cluster --name blue-green-lab
This deletes the local cluster, Istio installation, and application workloads. Your guide files remain in blue-green-istio.